Incorporating LDAP with Play 2.x (Scala) application

For people in hurry here is the code and the steps.

In continuation of Play 2.x (Scala) is it a Spring MVC contender? – Introduction, in this blog, I extend my earlier blog Incorporating Authorization into Play 2.x (Scala) application to integrate with LDAP instead of database.

Again there might be better ways to do this, but right now there is no clear documentation. A quick googling will display this Google group link and this link and this Github code. All of them were of little help to me. So I took the 1st step and put one of these. I have used Unboundid LDAP SDK‘s InMemoryDirectoryServer.

As a first step we need to add the below dependency in Build.scala,

"com.unboundid" % "unboundid-ldapsdk" % "2.3.1",

Next we implement an in memory LDAP helper class LdapUtil.scala as below,

  def start(): InMemoryDirectoryServer = {
    val config = new InMemoryDirectoryServerConfig("dc=org");
    val listenerConfig = new InMemoryListenerConfig("test", null, 12345, null, null, null);
    config.setListenerConfigs(listenerConfig);
    config.setSchema(null); // do not check (attribute) schema
    val server = new InMemoryDirectoryServer(config);
    server.startListening();
...
    server.add("dn: cn=user@test.com,dc=staticsecurity,dc=geomajas,dc=org", "objectClass: person", "locale: nl_BE",
      "sn: NormalUser", "givenName: Joe", "memberOf: cn=testgroup,dc=roles,dc=geomajas,dc=org", "userPassword: password");
    server.add("dn: cn=admin@test.com,dc=staticsecurity,dc=geomajas,dc=org", "objectClass: person", "locale: nl_BE",
      "sn: Administrator", "givenName: Cindy", "memberOf: cn=testgroup,dc=roles,dc=geomajas,dc=org", "userPassword: password");

    server
  }

  def authenticate(email: String, password: String): Option[Account] = {
    val server = start

    val conn = server.getConnection();
    val entry = conn.getEntry("cn=" + email + ",dc=staticsecurity,dc=geomajas,dc=org");

    val permission = entry.getAttributeValue("sn").toString
    val retPass = entry.getAttributeValue("userPassword")
    server.shutDown(true)

    if (retPass.equals(password)) {
      println("password valid")
      val account = new Account(email, password, permission)
      toOption(account)
    } else {
      None
    }
  }

  def findByEmail(email: String): Option[Account] = {
    val server = start
    val conn = server.getConnection();
    val entry = conn.getEntry("cn=" + email + ",dc=staticsecurity,dc=geomajas,dc=org");

    val permission = entry.getAttributeValue("sn").toString
    val retPass = entry.getAttributeValue("userPassword")
    server.shutDown(true)

    val account = new Account(email, retPass, permission)
    toOption(account)
  }

If you notice the normal user rights are email:= user@test.com, pwd:= password and admin rights are email:= admin@test.com, pwd:= password. As in my earlier blog, we need to customize the AuthConfig as below,

trait AuthConfigImpl extends AuthConfig {
  type Id = String
  type User = Account
  type Authority = String
  val idTag = classTag[Id]
...
  def resolveUser(email: Id) = LdapUtil.findByEmail(email)
...
  def authorize(user: User, authority: Authority) = (user.permission, authority) match {
    case ("Administrator", _) => true
    case ("NormalUser", "NormalUser") => true
    case _ => false
  }
}

Login form looks as below as in Application.scala,

  val loginForm = Form {
    mapping("email" -> email, "password" -> text)(LdapUtil.authenticate)(_.map(u => (u.email, "")))
      .verifying("Invalid email or password", result => result.isDefined)
  }

Finally the usage looks as below refer CoffeesControler.scala,

def create = StackAction(AuthorityKey -> "Administrator") { implicit request =>
    database withSession {
      Ok(html.coffees.createForm(form, supplierSelect))
    }
  }

I hope this blog helped.
Incorporating Authorization into Play 2.x (Scala) application

For people in hurry here is the code and the steps.

In continuation of Play 2.x (Scala) is it a Spring MVC contender? – Introduction, in this blog, I will demonstrate how to use play20-auth to adopt to coffee example.

As a first step for this example we need to add dependency in Build.scala as below,

    "jp.t2v" %% "play2.auth"      % "0.9",
    "jp.t2v" %% "play2.auth.test" % "0.9" % "test",

We need to define a Account.scala domain object with permissions as below,

object Account extends Table[Account]("ACCOUNT") {
  lazy val database = Database.forDataSource(DB.getDataSource())

  def id = column[Int]("ID")
  def email = column[String]("EMAIL")
  def password = column[String]("PASSWORD")
  def name = column[String]("NAME")
  def permission = column[Permission]("PERMISSION")
  // Every table needs a * projection with the same type as the table's type parameter
  def * = id ~ email ~ password ~ name ~ permission <> (Account.apply _, Account.unapply _)

In order for Account object to accept Permission.scala object as one of the column we need to implement MappedTypeMapper for the Permission as below,

  implicit val PermissionTimeMapper = MappedTypeMapper.base[Permission, String](
    d => Permission.stringValueOf(d),
    t => Permission.valueOf(t))

  def valueOf(value: String): Permission = value match {
    case "Administrator" => Administrator
    case "NormalUser" => NormalUser
    case _ => throw new IllegalArgumentException()
  }

  def stringValueOf(value: Permission): String = value match {
    case Administrator => "Administrator"
    case NormalUser => "NormalUser"
    case _ => throw new IllegalArgumentException()
  }

Next step is, we need to implement a trait AuthConfigImpl extending AuthConfig in Application.scala indicating what is the User class to authenticate, what is the column that contains the Permission information and what is the redirecting page as below,

trait AuthConfigImpl extends AuthConfig {

  type Id = Int

  type User = Account

  type Authority = Permission

  val idTag = classTag[Id]

  val sessionTimeoutInSeconds = 3600

  def resolveUser(id: Id) = Account.findById(id)

  def loginSucceeded(request: RequestHeader) = Redirect(routes.CoffeesController.index)

  def logoutSucceeded(request: RequestHeader) = Redirect(routes.Application.login)

  def authenticationFailed(request: RequestHeader) = Redirect(routes.Application.login)

  def authorizationFailed(request: RequestHeader) = Forbidden("no permission")

  def authorize(user: User, authority: Authority) = (user.permission, authority) match {
    case (Administrator, _) => true
    case (NormalUser, NormalUser) => true
    case _ => false
  }
}

Now we need to submit the loginForm to authenticate a user in Application.scala as below,

  val loginForm = Form {
    mapping("email" -> email, "password" -> text)(Account.authenticate)(_.map(u => (u.email, "")))
      .verifying("Invalid email or password", result => result.isDefined)
  }

Account.scala authenticate method looks as below,

  def authenticate(email: String, password: String): Option[Account] = {
    findByEmail(email).filter { account => password.equals(account.password) }
  }

For details about integration with the action in the controller refer CoffeesController.scala as below,

object CoffeesController extends Controller with AuthElement with AuthConfigImpl {
  def delete(pk: String) = StackAction(AuthorityKey -> Administrator) { implicit request =>
    database withSession {
      Home.flashing(Coffees.findByPK(pk).delete match {
        case 0 => "failure" -> "Entity has Not been deleted"
        case x => "success" -> s"Entity has been deleted (deleted $x row(s))"
      })
    }
  }
}

Notice how we use StackAction and validate for Administrator permission in the controller.

I hope this blog helped you.

Play 2.x (Scala) is it a Spring MVC contender? – Introduction

For people in hurry here is the code and the steps.

I have been playing with Scala and Play 2.x for past 6 months and have gained lot of knowledge. I have been working with Spring related technologies for past 8 yrs. In the next few blogs I will be really exploring if the Scala flavor of Play 2.x is ready for prime time.

As usual, I will be exploring how well we can build Data Access Layer, Controller, Frontend integration with Play 2.x using Test Driven Development. I will also be exploring how well Play 2.x is integrated with Security (Authentication/Authorization) capabilities and how well Scala is integrated with other Authentication systems like LDAP.

The use case I will be talking in the next few blogs is the popular Coffee Supplier web application, which demonstrates a simple CRUD base application. And I will elaborate aspects only Admin users can create the Coffee and Normal users can see the list.

One common thing about Play 2.x and Spring MVC is both follow MVC design patterns. There are also other Scala Web frameworks like Lift, I haven’t played with it yet.

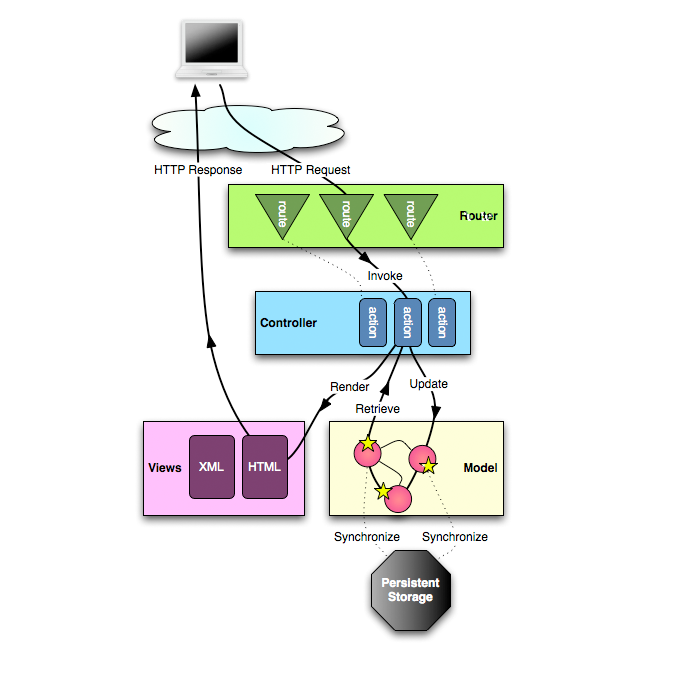
Overall architecture of Play 2.1 MVC is as below

Play 2.1 over all architecture

Play 2.1 over all architecture

In this example, I will use popular tools like Slick to access the Database, Play-Auth to do authentication and authorization. And I will extensively use ScalaTest to do Test Driven Development( TDD)/ Behavior Driven Development( BDD).

The layers I will be developing in TDD in the order are,

Incorporating Login/ Authentication into Play 2.x (Scala) application

For people in hurry here is the code and the steps.

In continuation of Play 2.x (Scala) is it a Spring MVC contender? – Introduction, in this blog, I will demonstrate how to extend Security.Authenticated standard Play API to implement basic authentication in your application.

I took this code play-test-security as my basis for implementing Security.Authenticated based authentication.

As a first step, I will extend this class to implement a Security trait as below,

trait Secured {
  self: Controller =>

  /**
   * Retrieve the connected user id.
   */
  def username(request: RequestHeader) = request.session.get("email")

  /**
   * Redirect to login if the use in not authorized.
   */
  def onUnauthorized(request: RequestHeader): Result

  def IsAuthenticated(f: => String => Request[AnyContent] => Result) =
    Security.Authenticated(username, onUnauthorized) { user =>
      Action(request => f(user)(request))
    }
}

As provided in the comment section it is clear what each method does. Next step is to plumb the login steps refer Application.scala as below,

  lazy val loginForm = Form(
    tuple(
      "email" -> text,
      "password" -> text) verifying ("Invalid user or password", result => result match {
        case (email, password) => {
          println("user=" + email + " password=" + password);
          val userList = Users.authenticate(email, password)
          userList == 1
        }
        case _ => false
      }))

  def login = Action { implicit request =>
    Ok(html.login(loginForm))
  }

  /**
   * Handle login form submission.
   */
  def authenticate = Action { implicit request =>
    loginForm.bindFromRequest.fold(
      formWithErrors => BadRequest(html.login(formWithErrors)),
      user => Redirect(routes.CoffeesController.index).withSession("email" -> user._1))
  }

  /**
   * Logout and clean the session.
   */
  def logout = Action {
    Redirect(routes.Application.login).withNewSession.flashing(
      "success" -> "You've been logged out")
  }

The User Slick domain object and the authenticate method in User.scala looks as below,

object Users extends Table[User]("USER") {
  lazy val database = Database.forDataSource(DB.getDataSource())

  // -- Parsers

  def email = column[String]("EMAIL", O.PrimaryKey)
  def name = column[String]("NAME")
  def password = column[String]("PASSWORD")

  def * = email ~ name ~ password <> (User.apply _, User.unapply _)
//....
  def authenticate(email: String, password: String): Int = {
    database withSession { implicit session =>
      val q1 = for (u       println("^^^^^^^^" + Query(q1.length).first)
      Query(q1.length).first
    }
  }

Finally the CoffeesController.scala where we need to override onUnauthorized method and put the IsAuthenticated block in each action as below,

  def onUnauthorized(request: RequestHeader) = Results.Redirect(routes.Application.login())

  /**
   * Display the paginated list.
   *
   * @param page Current page number (starts from 0)
   * @param orderBy Column to be sorted
   * @param filter Filter applied on entity names
   */
  def list(page: Int, orderBy: Int, filter: String = "%") = IsAuthenticated { username =>
    implicit request =>
      database withSession {
        Ok(html.coffees.list(
          Page(Coffees.list(page, pageSize, orderBy, filter).list,
            page,
            offset = pageSize * page,
            Coffees.findAll(filter).list.size),
          orderBy,
          filter))
      }
  }

To test if authentication worked, start play,

play run

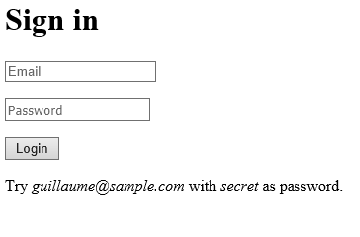
And when you type the url http://localhost:9000/coffee, you get the login page as below,

Scala Secured.Authenticated-login

Scala Secured.Authenticated-login

I hope this blog helped you. In my next blog, I will show how you do authorization.

Testing Frontend integration with Play 2.x (Scala)

For people in hurry here is the code and the steps.

In continuation of Play 2.x (Scala) is it a Spring MVC contender? – Introduction, in this blog, I will demonstrate how we implement a simple test to test the Web layer using TestServer. I will continue from my earlier example of Implementing Controller using Play 2.x (Scala), ScalaMock where I did the mock testing.

Refer Build.scala for build configuration.

In this blog, I will be testing the routes refer CoffeesControllerTest.scala for more details, the snippet is as below,

    it("POST /coffees/Colombian/delete should return SEE_OTHER") {
      running(FakeApplication(additionalConfiguration = inMemoryDatabase())) {

        val Some(result) = route(FakeRequest(POST, "/coffees/Colombian/delete"))
        status(result) should equal(SEE_OTHER)
      }
    }

    it("POST wrong url /coffees/Colombian/delete1 should return None") {
      running(FakeApplication(additionalConfiguration = inMemoryDatabase())) {

        val result = route(FakeRequest(POST, "/coffees/Colombian/delete1"))
        result should equal(None)
      }
    }

In the next block I will show how to do end to end testing from web layer using TestServer refer IntegrationTest.scala ,

class IntegrationSpec extends Specification {

  "Application" should {

    "work from within a browser" in {
      running(TestServer(3333), HTMLUNIT) { browser =>

        browser.goTo("http://localhost:3333/coffees")
        browser.pageSource must contain("Colombian")
      }
    }

    "work from within a browser" in {
      running(TestServer(3333), HTMLUNIT) { browser =>

        browser.goTo("http://localhost:3333/coffees")

        browser.pageSource must contain("Colombian")
      }
    }

    "work from within a browser" in {
      running(TestServer(3333), HTMLUNIT) { browser =>

        browser.goTo("http://localhost:3333/coffees")
        browser.pageSource must not contain("Colombian1")
      }
    }

  }
}

Also while testing the application from web layer, we need to populate the data in the Global.scala as below,

object Global extends GlobalSettings {

  override def onStart(app: Application) {

    lazy val database = Database.forDataSource(DB.getDataSource())

    database withSession {
      // Create the tables, including primary and foreign keys
      val ddl = (Suppliers.ddl ++ Coffees.ddl)

      ddl.create

      // Insert some suppliers
      Suppliers.insertAll(
        Supplier(Some(101), "Acme, Inc.", "99 Market Street", "Groundsville", "CA", "95199"),
//...
      // Insert some coffees (using JDBC's batch insert feature, if supported by the DB)
      Coffees.insertAll(
        Coffee(Some("Colombian"), 101, 799, 0, 0),
    }
  }
}

I hope this blog helped you. In the next blog I will implement simple authentication.

Implementing Controller using Play 2.x (Scala), ScalaMock

For people in hurry here is the code and the steps.

In continuation of Play 2.x (Scala) is it a Spring MVC contender? – Introduction, in this blog, I will demonstrate how we implement a simple Controller implementation using ScalaTest / ScalaMock. I will continue from my earlier example of Implementing DAL in Play 2.x (Scala), Slick, ScalaTest of the basic CRUD operations on Coffee catalogue.

In this example as well we need the ScalaMock dependency in Build.scala as below,

 
"com.typesafe.slick" %% "slick" % "1.0.0",
...
"org.scalamock" %% "scalamock-scalatest-support" % "3.0" % "test",

In our Previous example, we have already implemented a DAL trait called CoffeeComponent with basic CRUD as below,

trait CoffeeComponent {
  def find(pk: String): Query[Coffees.type, Coffee]
  def findall(pk: String): Query[(Coffees.type, Suppliers.type), (Coffee, Supplier)]
  def list(page: Int, pageSize: Int, orderBy: Int, filter: String): Query[(Coffees.type, Suppliers.type), (Coffee, Supplier)]
  def delete(pk: String): Int
}

We are construction injecting CoffeeComponent to the CoffeeController and create a Singleton object with the same name, as below,

class CoffeesController(coffeeComponent: CoffeeComponent) extends Controller {
...
  def delete(pk: String) = Action {
    database withSession {
      println("in db session")
      Home.flashing(coffeeComponent.delete(pk) match {
        case 0 => "failure" -> "Entity has Not been deleted"
        case x => "success" -> s"Entity has been deleted (deleted $x row(s))"
      })
    }
  }
}

object CoffeesController extends CoffeesController(new CoffeeComponentImpl)

As seen above, we have a delete method, we will build a ScalaMock to mock the delete method of coffeeComponent and control the expected behavior to return 1 row effected and assert for HTTP SEE_OTHER status as below,

class CoffeesControllerTest extends FunSpec with ShouldMatchers with MockFactory {
  describe("Coffee Controller with Mock test") {

    it("should delete a coffee record with assert on status") {
      running(FakeApplication(additionalConfiguration = inMemoryDatabase())) {
        val mockComponent = mock[CoffeeComponent]
        (mockComponent.delete _).expects("Columbian") returning (1) twice
        val controller = new CoffeesController(mockComponent)
        mockComponent.delete("Columbian") should equal (1)
        val result = controller.delete("Columbian")(FakeRequest())
        status(result) should equal (SEE_OTHER)
      }
    }
  }
}

If you notice, we are extending FunSpec of ScalaTest for BDD. Also the HTTP status is SEE_OTHER, this is because the Success is redirected to Index page.

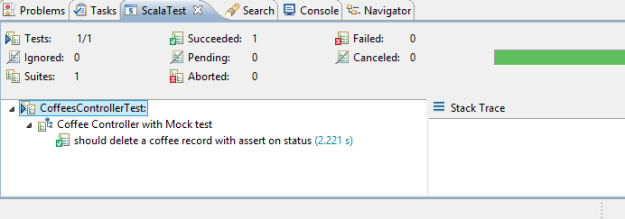
Now if you run the ScalaTest you will see the result in STS as below,

ScalaTest Coffee Example with ScalaMock

ScalaTest Coffee Example with ScalaMock

I hope this blog helped. In my next blog, I will talk about controller routes testing and Frontend testing.

Implementing DAL in Play 2.x (Scala), Slick, ScalaTest

For people in hurry here is the code and the steps.

In continuation of Play 2.x (Scala) is it a Spring MVC contender? – Introduction, in this blog, I will demonstrate how we implement a simple Data Access Layer using ScalaTest and using Behavior Driven Development.

The technical stack I will be using for this demo is Java 7, Play 2.1.0, Scala 2.10.0, Slick 1.0.0, ScalaTest / ScalaMock 3.0, STS IDE for Scala Development, Scala IDE plugin with ScalaTest.

As a first step create a Play project called coffee-example and select the language as Scala as below,

play new coffee-example

Now we need to include these dependencies in Build.scala. In this example, we don’t need ScalaMock but we will still include that dependency as below,

"com.typesafe.slick" %% "slick" % "1.0.0",
...
"org.scalamock" %% "scalamock-scalatest-support" % "3.0" % "test",

Let us convert this project into Eclipse project as below,

play eclipse

Let us open STS IDE and create a DomainTest.scala under test folder. The intent is we create a new CoffeeComponent class and implement a method findById method and pass a Coffee name and return the Coffee object and assert for its price. We also need initialize the data we are supposed to assert.

class DomainSpec extends FunSpec with ShouldMatchers with InitTrait {

  lazy val database = Database.forDataSource(DB.getDataSource())

  describe("Coffee Data Access") {

    it("should find Coffee object for a given Coffee name") {
      running(FakeApplication(additionalConfiguration = inMemoryDatabase())) {
        database withSession {
          init

          val cc = new CoffeeComponentImpl()
          val c = cc.find("Colombian")
          c.first.price should equal(799L)
        }
      }
    }
  }
}

One bug I noticed is, when there are multiple test cases opening database connection it will create Attempting to obtain a connection from a pool that has already been shutdown error.

We create a CoffeeComponent trait and CoffeeComponentImpl, which create basic CRUD operations as below,

trait CoffeeComponent {
  def find(pk: String): Query[Coffees.type, Coffee]
  def findall(pk: String): Query[(Coffees.type, Suppliers.type), (Coffee, Supplier)]
  def list(page: Int, pageSize: Int, orderBy: Int, filter: String): Query[(Coffees.type, Suppliers.type), (Coffee, Supplier)]
  def delete(pk: String): Int
}

class CoffeeComponentImpl extends CoffeeComponent {

  def find(pk: String): Query[Coffees.type, Coffee] = {
    Coffees.findByPK(pk)
  }

  def findall(pk: String): Query[(Coffees.type, Suppliers.type), (Coffee, Supplier)] = {
    Coffees.findAll(pk)
  }

  def list(page: Int, pageSize: Int, orderBy: Int, filter: String): Query[(Coffees.type, Suppliers.type), (Coffee, Supplier)] = {
    Coffees.list(page, pageSize, orderBy, filter)
  }

  def delete(pk: String): Int = {
    find(pk).delete
  }
}

We also need to create the Initialize Data for the test as below,

trait InitTrait {
  def init = {
    val ddl = (Suppliers.ddl ++ Coffees.ddl)

    ddl.drop
    ddl.create
    // Insert some suppliers
    Suppliers.insertAll(
      Supplier(Some(101), "Acme, Inc.", "99 Market Street", "Groundsville", "CA", "95199"))
.....
    Coffees.insertAll(
      Coffee(Some("Colombian"), 101, 799, 0, 0))
}
}

Now run the ScalaTest from Eclipse IDE, you will see something as below,

ScalaTest Coffee Example

ScalaTest Coffee Example

I hope this blog helped you. In the next blog I will demonstrate how we can mock a Controller and test the Controller.

Integrating Play 2.1 with Slick 1.0.0 Database query DSL

For people in hurry here is the code and the steps to setup.

Refer this blog on Play 2.0: Building Web Application using Scala for details on Play and Scala.

In the next few blogs I will be writing enterprise class web application using Play and Scala. I will be covering topics like Database modeling and Security. Now officially Scala has adopted Slick as the Database query DSL. But when you create a new Play application and add Slick library as mentioned in this blog, it is not working. It gives a strange error like No suitable driver found in tests.

I also found slick-play2-example, this sample expect us to create a DAL layer, but we cannot directly play with slick in our test code.

After much further research I came across this plugin. I tried integrating this with my Play application and it worked like a charm.

We will define a Coffee class and a Supplier class. One Coffee has multiple Suppliers. The class design is as below,

case class Coffee(name: String, supID: Int, price: Double, sales: Int, total: Int)

object Coffees extends Table[Coffee]("COFFEES") {
def name = column[String]("COF_NAME", O.PrimaryKey)
def supID = column[Int]("SUP_ID")
def price = column[Double]("PRICE")
def sales = column[Int]("SALES")
def total = column[Int]("TOTAL")
def * = name ~ supID ~ price ~ sales ~ total <> (Coffee.apply _, Coffee.unapply _)
// A reified foreign key relation that can be navigated to create a join
def supplier = foreignKey("SUP_FK", supID, Suppliers)(_.id)
}

case class Supplier(id: Int, name: String, street: String, city: String, state: String, zip: String)

// Definition of the SUPPLIERS table
object Suppliers extends Table[Supplier]("SUPPLIERS") {
def id = column[Int]("SUP_ID", O.PrimaryKey) // This is the primary key column
def name = column[String]("SUP_NAME")
def street = column[String]("STREET")
def city = column[String]("CITY")
def state = column[String]("STATE")
def zip = column[String]("<a class="zem_slink" title="ZIP (file format)" href="http://en.wikipedia.org/wiki/ZIP_%28file_format%29" target="_blank" rel="wikipedia">ZIP</a>")
// Every table needs a * projection with the same type as the table's type parameter
def * = id ~ name ~ street ~ city ~ state ~ zip <> (Supplier.apply _, Supplier.unapply _)
}

Below is the ScalaTest to test various capabilities of Slick,

DB.withSession{ implicit session =>

//Populate sample data
val testSuppliers = Seq(
Supplier(101, "Acme, Inc.",      "99 Market Street", "Groundsville", "CA", "95199"),
Supplier( 49, "Superior Coffee", "1 Party Place",    "Mendocino",    "CA", "95460"),
Supplier(150, "The High Ground", "100 Coffee Lane",  "Meadows",      "CA", "93966")
)
Suppliers.insertAll( testSuppliers: _*)

val testCoffees= Seq(
Coffee("Colombian",         101, 7.99, 0, 0),
Coffee("French_Roast",       49, 8.99, 0, 0),
Coffee("Espresso",          150, 9.99, 0, 0),
Coffee("Colombian_Decaf",   101, 8.99, 0, 0),
Coffee("French_Roast_Decaf", 49, 9.99, 0, 0)
)
Coffees.insertAll( testCoffees: _*)

//Assert coffee data equals to the test list of coffee
Query(Coffees).list must equalTo(testCoffees)

//List all coffee less than $10
val q1 = for { c <- Coffees if c.price < 10.0 } yield (c.name)

q1 foreach println
println("**************");

//return all suppliers for coffee less than $9.0
val q2 = for { c <- Coffees if c.price < 9.0
s <- c.supplier } yield (c.name, s.name)

q2 foreach println
println("**************");

//return all suppliers for coffee using zip
val q3 = for {
(c, s) <- Coffees zip Suppliers
} yield (c.name, s.name)

q3 foreach println
println("**************");

//Union
val q4 = Query(Coffees).filter(_.price < 8.0)
val q5 = Query(Coffees).filter(_.price > 9.0)
val unionQuery = q4 union q5
unionQuery foreach println
println("**************");

//Union second approach
val unionAllQuery = q4 unionAll q5
unionAllQuery foreach println
println("**************");

//Group by
val r = (for {
c <- Coffees
s <- c.supplier
} yield (c, s)).groupBy(_._1.supID)

//Aggregation
val r1 = r.map { case (supID, css) =>
(supID, css.length, css.map(_._1.price).avg)
}

r1 foreach println
}

In my next blog, I will take a real example and implement using Slick. I hope this blog helped.

Integrating Kickstrap with Spring MVC application

Get the latest code from Github,

In continuation of my earlier blogs on Introduction to Spring MVC, in this blog I will talk about Kickstrap, Less and how Kickstrap can be integrated with our Spring MVC based bookstore application.

If you go to Kickstrap website they mention that it is Twitter Bootstrap on Steroids. It is heavily based on Less which is a dynamic stylesheet language. You can download Kickstrap from here.

Advantages of using Kickstrap is,

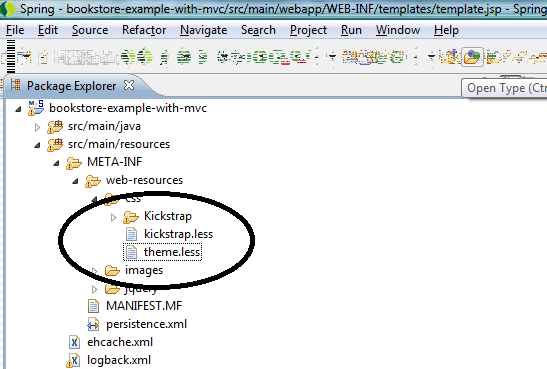
As a 1st step we need to copy the Kickstrap in the application folder as below,

kickstrap bookstore-app

kickstrap bookstore-app

The tiles definition in tiles.xml in Spring MVC is as below,

<tiles-definitions>
<definition name="template" template="/WEB-INF/templates/template.jsp">
<put-attribute name="header" value="/WEB-INF/templates/header.jsp"/>
<put-attribute name="footer" value="/WEB-INF/templates/footer.jsp"/>
</definition>
...
</tiles-definitions>

In the template.jsp you need to add Kickstrap.less and less-1.3.0.min.js as below,

<link rel="stylesheet/less" type="text/css" href="/bookstore-example-with-mvc/resources/css/kickstrap.less">
<script src="/bookstore-example-with-mvc/resources/css/Kickstrap/js/less-1.3.0.min.js"></script>

If you see the template.jsp, we use some of the css class of Kickstrap like “container”, “row-fluid” and others. row-fluid helps in responsive web design.

Changing to different theme

In Kickstrap changing to different theme is easy. Open the theme.less, currently we are using cerulean theme, as below

@import "Kickstrap/themes/cerulean/variables.less";
@import "Kickstrap/themes/cerulean/bootswatch.less";

Now run the below command and open the browser and type http://localhost:8080/bookstore-example-with-mvc,

mvn clean tomcat7:run

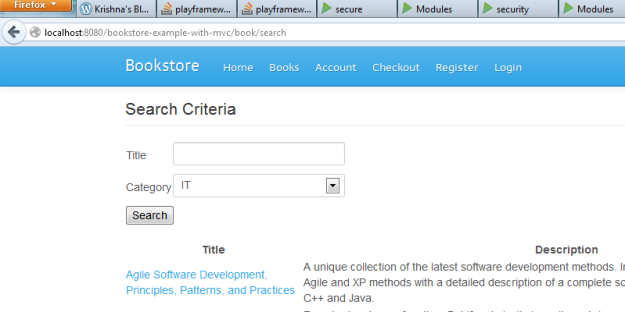
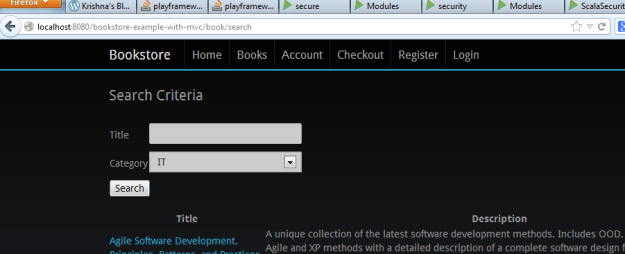
The theme looks as below,

cerulean-theme

cerulean-theme

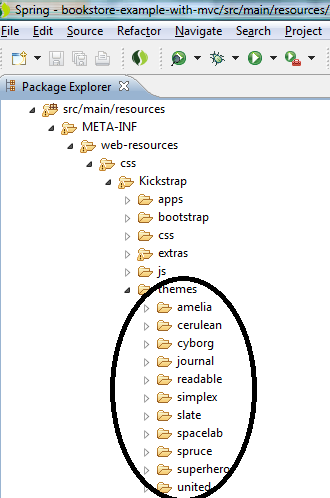
Below are the themes when you drilldown Kickstrap folder as shown below,

themes-bookstore-app

themes-bookstore-app

If you want to change it to, let us say cyborg theme, you need to change kickstrap.less as below,

@import "Kickstrap/themes/cyborg/variables.less";
@import "Kickstrap/themes/cyborg/bootswatch.less";

Now run the below command and open the browser and type http://localhost:8080/bookstore-example-with-mvc, you will see the change in theme,

mvn clean tomcat7:run

The theme is changed and looks as below,

cyborg-theme

cyborg-theme

I hope this blog helped you.

Reference:

Pro Spring MVC: With Web Flow by by Marten Deinum, Koen Serneels

JUnit testing of Spring MVC application – Introduction

For people in hurry, here is the Github code and the steps to run the sample.

Spring MVC is one of the leading Java Web application frameworks along with Struts. In the next few blogs, I will take an use case and demonstrate how to develop a good quality web application in an enterprise Java world. I will also demonstrate latest capabilities of Spring like Annotation based configurations and its advantages over XML based configurations. Prerequisite for this application is Java 7.x, Tomcat 7.x, Maven 3.x and STS IDE.

The use case I will be talking about is a Bookstore application, where in user register to this application and purchase books. There is also an administration task like creating the book catalog.

Spring MVC application architecture

Source Java9s: Spring MVC Architecture

Source Java9s: Spring MVC Architecture

For this sample application we extensively use the Latest Spring MVC annotation capability. The major advantage with this is we will not be depending on any xml configuration including web.xml. I personally like XML configuration with namespace, because it is readable. The advantage of annotation is, since everything is Java, if we use STS IDE, any typo can be caught at compilation time,  and we can write a good quality code and even measure the code coverage. We also used Kickstrap as the css engine for this application. Here is a blog on Integrating Kickstrap with Spring MVC application.

What is code coverage

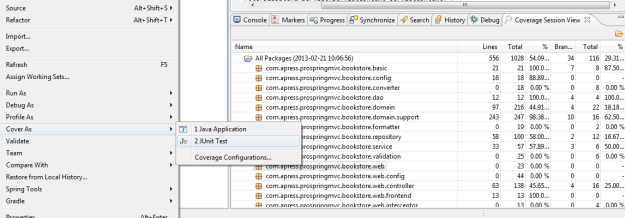
Code coverage is a measure of how well you unit tested your code. If you use a good IDE like STS IDE we can install ecobertura using the update site. Once you setup ecobertura, you can start developing your application. When you run your JUnit test in “Cover as” mode, it will show the code coverage of your JUnit tests as below,

eCobertura STS-IDE view

eCobertura STS-IDE view

In the subsequent blogs I will use test driven development (TDD) to build each layer and gradually increase the code coverage and write better quality code. The layers I will be developing in TDD in the order are,

Reference:

Pro Spring MVC: With Web Flow by by Marten Deinum, Koen Serneels