Category Archives: Spring MVC

Integrating Kickstrap with Spring MVC application

Get the latest code from Github,

In continuation of my earlier blogs on Introduction to Spring MVC, in this blog I will talk about Kickstrap, Less and how Kickstrap can be integrated with our Spring MVC based bookstore application.

If you go to Kickstrap website they mention that it is Twitter Bootstrap on Steroids. It is heavily based on Less which is a dynamic stylesheet language. You can download Kickstrap from here.

Advantages of using Kickstrap is,

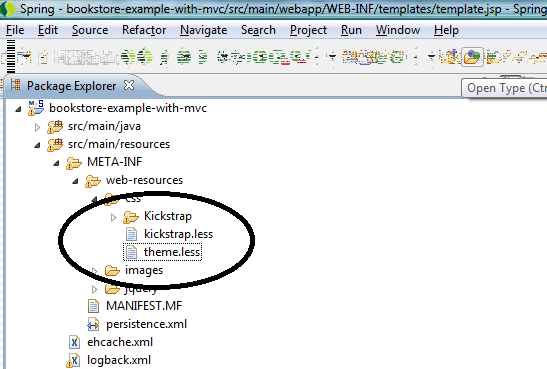
As a 1st step we need to copy the Kickstrap in the application folder as below,

kickstrap bookstore-app

kickstrap bookstore-app

The tiles definition in tiles.xml in Spring MVC is as below,

<tiles-definitions>
<definition name="template" template="/WEB-INF/templates/template.jsp">
<put-attribute name="header" value="/WEB-INF/templates/header.jsp"/>
<put-attribute name="footer" value="/WEB-INF/templates/footer.jsp"/>
</definition>
...
</tiles-definitions>

In the template.jsp you need to add Kickstrap.less and less-1.3.0.min.js as below,

<link rel="stylesheet/less" type="text/css" href="/bookstore-example-with-mvc/resources/css/kickstrap.less">
<script src="/bookstore-example-with-mvc/resources/css/Kickstrap/js/less-1.3.0.min.js"></script>

If you see the template.jsp, we use some of the css class of Kickstrap like “container”, “row-fluid” and others. row-fluid helps in responsive web design.

Changing to different theme

In Kickstrap changing to different theme is easy. Open the theme.less, currently we are using cerulean theme, as below

@import "Kickstrap/themes/cerulean/variables.less";
@import "Kickstrap/themes/cerulean/bootswatch.less";

Now run the below command and open the browser and type http://localhost:8080/bookstore-example-with-mvc,

mvn clean tomcat7:run

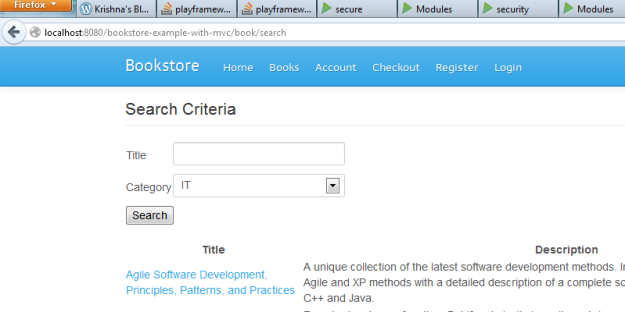
The theme looks as below,

cerulean-theme

cerulean-theme

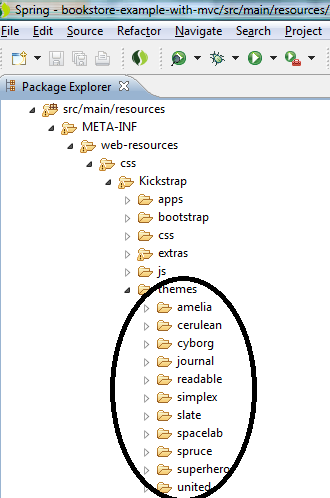
Below are the themes when you drilldown Kickstrap folder as shown below,

themes-bookstore-app

themes-bookstore-app

If you want to change it to, let us say cyborg theme, you need to change kickstrap.less as below,

@import "Kickstrap/themes/cyborg/variables.less";
@import "Kickstrap/themes/cyborg/bootswatch.less";

Now run the below command and open the browser and type http://localhost:8080/bookstore-example-with-mvc, you will see the change in theme,

mvn clean tomcat7:run

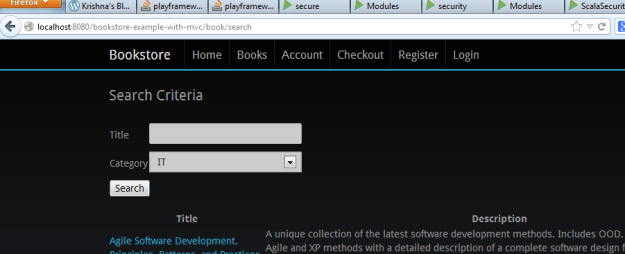
The theme is changed and looks as below,

cyborg-theme

cyborg-theme

I hope this blog helped you.

Reference:

Pro Spring MVC: With Web Flow by by Marten Deinum, Koen Serneels
JUnit testing of Spring MVC application – Introduction

For people in hurry, here is the Github code and the steps to run the sample.

Spring MVC is one of the leading Java Web application frameworks along with Struts. In the next few blogs, I will take an use case and demonstrate how to develop a good quality web application in an enterprise Java world. I will also demonstrate latest capabilities of Spring like Annotation based configurations and its advantages over XML based configurations. Prerequisite for this application is Java 7.x, Tomcat 7.x, Maven 3.x and STS IDE.

The use case I will be talking about is a Bookstore application, where in user register to this application and purchase books. There is also an administration task like creating the book catalog.

Spring MVC application architecture

Source Java9s: Spring MVC Architecture

Source Java9s: Spring MVC Architecture

For this sample application we extensively use the Latest Spring MVC annotation capability. The major advantage with this is we will not be depending on any xml configuration including web.xml. I personally like XML configuration with namespace, because it is readable. The advantage of annotation is, since everything is Java, if we use STS IDE, any typo can be caught at compilation time,  and we can write a good quality code and even measure the code coverage. We also used Kickstrap as the css engine for this application. Here is a blog on Integrating Kickstrap with Spring MVC application.

What is code coverage

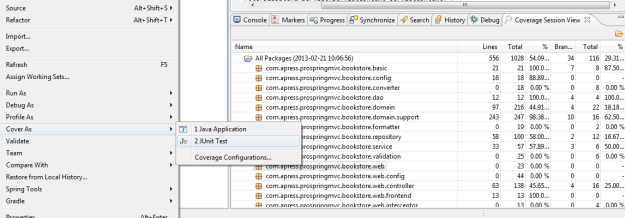
Code coverage is a measure of how well you unit tested your code. If you use a good IDE like STS IDE we can install ecobertura using the update site. Once you setup ecobertura, you can start developing your application. When you run your JUnit test in “Cover as” mode, it will show the code coverage of your JUnit tests as below,

eCobertura STS-IDE view

eCobertura STS-IDE view

In the subsequent blogs I will use test driven development (TDD) to build each layer and gradually increase the code coverage and write better quality code. The layers I will be developing in TDD in the order are,

Reference:

Pro Spring MVC: With Web Flow by by Marten Deinum, Koen Serneels
JUnit testing of Spring MVC application: Testing Spring Webflow

For people in hurry get the latest code from Github and run the below command,


mvn clean test -Dtest=com.example.bookstore.web.controller.CreateOrderTest

In continuation of my earlier blogs on Introduction to Spring MVC and Testing Frontend using Selenium in Spring MVC, in this blog I will demonstrate how to test Web layer in Spring MVC and Spring Web Flow. If you want to measure the quality of JUnit testing of your Spring Web Flow application refer Measuring navigation flow JUnit test in Spring Web flow. There is another blog I have written on JUnit testing Spring Web Flow refer JUnit testing with Spring Webflow.

In this blog I will demo how to build a Spring Web Flow based application using Test driven development (TDD). The use case I will be talking of is a web flow where in user drills down thru few categories and selects few books and select delivery options and place an order.

There is a good introduction of Spring Web Flow here. But just to give a brief introduction about Spring Web Flow, it is composed of a set of states. A state is a point in the flow where some event happens: for instance showing books list for a category or adding the books to the shopping cart. Each state has one or more transitions that are used to move to another state. A transition is triggered by an event.

As a first step, please refer this createOrders-flow.xml, if you notice carefully OrderForm is stored in the flowScope. And this object carries the state between each step. Let us see the bootstrapping process in JUnit test as below,

public class CreateOrderTest extends AbstractXmlFlowExecutionTests {
private OrderController orderController;

protected void setUp() {
orderController = Mockito.mock(OrderController.class);
}

@Override
protected void configureFlowBuilderContext(MockFlowBuilderContext builderContext) {
builderContext.registerBean("orderController", orderController);
}

@Override
protected FlowDefinitionResource getResource(FlowDefinitionResourceFactory resourceFactory) {
return resourceFactory.createFileResource("src/main/webapp/WEB-INF/view/public/createOrders/createOrders-flow.xml");
}

//JUnit tests below
}

If you notice this class is subclassed from a class AbstractXmlFlowExecutionTests, it has 3 overridden methods, setup, configureFlowBuilderContext, getResource. getResource method is the one where we set the createOrders-flow.xml and is returned for testing. If you also notice we have used Mockito to mock OrderController and register the bean in the flow XML.

Let us start building the JUnit test to test each node (view-state) of the flow. For starting the flow you need to do as below,

public void testStartCreateOrderFlow() {

MutableAttributeMap input = new LocalAttributeMap();
MockExternalContext context = new MockExternalContext();
startFlow(input, context);

Mockito.verify(orderController, VerificationModeFactory.times(1)).initializeForm();
Mockito.verify(orderController, VerificationModeFactory.times(1)).initializeSelectableCategories();

assertCurrentStateEquals("selectCategory");
assertResponseWrittenEquals("selectCategory", context);
}

If you notice carefully in the flow, we are asking the controller to call the initializeForm at on-start event and call initializeSelectableCategories at on-render of selectCategory view-state.

Using Mockito we are verifying if the initializeForm and initializeSelectableCategories called once only. And finally we assert for the next state.

Similarly we test other view states.

Finally we test calling a subflow by mocking the subflow, refer createMockBookingSubflow below you will get the idea. If you want to understand more refer Mocking a subflow.


public void testSelectDeliveryOptions_AddAndNext() {

setCurrentState("selectDeliveryOptions");
 getFlowScope().put("orderForm", createTestOrderForm());
 getFlowDefinitionRegistry().registerFlowDefinition(createMockBookingSubflow());

MockExternalContext context = new MockExternalContext();
 context.setEventId("finish");
 resumeFlow(context);
 }

private Flow createMockBookingSubflow() {
 Flow mockBookingFlow = new Flow("secured/placeOrders");
 mockBookingFlow.setInputMapper(new Mapper() {
 public MappingResults map(Object source, Object target) {
 // assert that 1L was passed in as input
 return null;
 }
 });
 // immediately return the bookingConfirmed outcome so the caller can respond
 new EndState(mockBookingFlow, "endOrderOk");
 return mockBookingFlow;
 }

I hope this blog helped you. In my next blog I will be taking about integrating Kickstrap with Spring MVC application.

Reference:

Pro Spring MVC: With Web Flow by by Marten Deinum, Koen Serneels
JUnit testing of Spring MVC application: Testing Frontend using Selenium

In continuation of my earlier blogs on Introduction to Spring MVC and Testing Controller in Spring MVC, in this blog I will demonstrate how to test Web layer in Spring MVC. We can also incorporate Authentication and Authorization, learn more about it in the blogs on Spring Security.

The objective of this demo is 2 fold, to build the plumbing for Web layer using TDD and actually test the web layer using Selenium Java API.

For people in hurry, get the latest code from Github and run the below 2 commands in order

mvn clean tomcat7:run

mvn clean test -Dtest=com.example.bookstore.web.frontend.SeleniumLoginFrontendTest

Maven dependency to use Selenium is as below

<dependency>
<groupId>org.seleniumhq.selenium</groupId>
<artifactId>selenium-java</artifactId>
<version>2.26.0</version>
<scope>test</scope>
</dependency>
<dependency>
<groupId>org.seleniumhq.selenium</groupId>
<artifactId>selenium-firefox-driver</artifactId>
<version>2.26.0</version>
<scope>test</scope>
</dependency>
<dependency>
<groupId>org.seleniumhq.selenium</groupId>
<artifactId>selenium-htmlunit-driver</artifactId>
<version>2.26.0</version>
<scope>test</scope>
</dependency>

Also you need to install Selenium IDE plugin for Firefox.

Since this is a web application, we need to build the plumbing for web application, See the com.example.bookstore.web.BookstoreWebApplicationInitializer for more details. Also notice that we don’t need any web.xml if we use the latest Spring 3.0. But when you try to build the project, maven complains that war project should have web.xml. In order to get around this we need to set failOnMissingWebXml to false as shown in the below configuration in pom.xml,

<plugin>
<groupId>org.apache.maven.plugins</groupId>
<artifactId>maven-war-plugin</artifactId>
<version>2.3</version>
<configuration>
<archive>
<addMavenDescriptor>false</addMavenDescriptor>
</archive>
<archiveClasses>true</archiveClasses>
<failOnMissingWebXml>false</failOnMissingWebXml>
</configuration>
</plugin>

Now let us start exploring the JUnit test for this,

public class SeleniumLoginFrontendTest {

private WebDriver browser;

@Before
public void setup() {
browser = new FirefoxDriver();
}

@Test
public void startTest() {
browser.get("http://localhost:8080/bookstore-example-with-mvc/");

browser.findElement(By.id("login")).click();

// Will throw exception if elements not found
browser.findElement(By.id("username")).sendKeys("jd");
browser.findElement(By.id("password")).sendKeys("secret");

browser.findElement(By.id("loginButton")).click();
browser.findElement(By.id("account")).click();

assertEquals("John", browser.findElement(By.id("firstName")).getAttribute("value"));
}

@After
public void tearDown() {
browser.close();
}
}

Finally run the application in the tomcat7 using Maven command and run the JUnit test as mentioned in the beginning of this blog. The tests will succeed.

I hope this blog helped you. In my next blog, I will talk about how to implement Spring Web flow using TDD.

Reference:

Pro Spring MVC: With Web Flow by by Marten Deinum, Koen Serneels
JUnit testing of Spring MVC application: Testing Controller

[I have added a new Spring Boot Tutorial on this, please review give me feedback.]

In continuation of my earlier blogs on Introduction to Spring MVC and Testing Service layer in Spring MVC, in this blog I will demonstrate how to test Controller in Spring MVC. The objective of this demo is 2 fold, to build the Controller layer using TDD and increase the code coverage during JUnit testing of Controller.

For people in hurry, get the latest code from Github and run the below command

mvn clean test -Dtest=com.example.bookstore.web.controller.SpringMvcTestLoginControllerTest

Since in my earlier blog, we have already tested and implemented Service layer, in this blog we only need to focus on testing Controller. For testing the Controller I will use Spring-Test-MVC framework, which I have discussed enough in my earlier blogs. Spring-test-MVC implements a Domain Specific Language (DSL) for testing the Controller.

As a first step we define the LoginControllerTestConfiguration class with LoginControllerTest class. If you notice there are 2 beans defined in that class and we marked the as a @Configuration which shows that it is a Spring Context class. In the JUnit test we @Autowired LoginController class and @Autowired AccountService class. When creating the Bean in the configuration file we also stubbed the AccountService class using Mockito,

@RunWith(SpringJUnit4ClassRunner.class)
@ContextConfiguration
public class SpringMvcTestLoginControllerTest {

@Configuration
static class LoginControllerTestConfiguration {

@Bean
public AccountService accountService() {
return Mockito.mock(AccountService.class);
}

@Bean
public LoginController loginController() {
return new LoginController();
}
}
@Autowired
private LoginController loginController;

@Autowired
private AccountService accountService;
}

As a next step let us setup the data. If you notice the below code, we have also stubbed AccountService’s login method to return pre-configured data using Mockito.

@Before
public void setup() throws Exception {
this.account = new AccountBuilder() {
{
address("Herve", "4650", "Rue de la station", "1", null, "Belgium");
credentials("john", "secret");
name("John", "Doe");
}
}.build(true);

Mockito.when(this.accountService.login("john", "secret")).thenReturn(this.account);
}

Next we write the test where we set the loginController to the MockMvcBuilders and use Spring-test-MVC’s DSL to call the controller layer and do the asserts. Now if you run the test it will succeed.

@Test
public void testHandleLogin() throws Exception {
MockMvc mockMvc = MockMvcBuilders.standaloneSetup(this.loginController).build();
mockMvc.perform(post("/login").param("username", "john").param("password", "secret"))
.andExpect(status().isOk())
.andExpect(request().sessionAttribute(LoginController.ACCOUNT_ATTRIBUTE, this.account))
.andExpect(redirectedUrl("/index.htm"));
}

Finally, loginController looks as below,

@Controller
@RequestMapping(value = "/login")
public class LoginController {

@Autowired
private AccountService accountService;

@RequestMapping(method = RequestMethod.POST)
public String handleLogin(@RequestParam String username, @RequestParam String password, HttpSession session)
throws AuthenticationException {
Account account = this.accountService.login(username, password);
session.setAttribute(ACCOUNT_ATTRIBUTE, account);
String url = (String) session.getAttribute(REQUESTED_URL);
session.removeAttribute(REQUESTED_URL); // Remove the attribute
if (StringUtils.hasText(url) && !url.contains("login")) { // Prevent loops for the login page.
return "redirect:" + url;
} else {
return "redirect:/index.htm";
}
}
}

I hope this blog helped you. In my next blog we will implement the web layer.

Reference:

Pro Spring MVC: With Web Flow by by Marten Deinum, Koen Serneels

JUnit testing of Spring MVC application: Testing Service layer

[I have added a new Spring Boot Tutorial on this, please review give me feedback.]

In continuation of my earlier blogs on Introduction to Spring MVC and Testing DAO layer in Spring MVC, in this blog I will demonstrate how to test Service layer in Spring MVC. The objective of this demo is 2 fold, to build the Service layer using TDD and increase the code coverage during JUnit testing of Service layer.

For people in hurry, get the latest code from Github and run the below command

mvn clean test -Dtest=com.example.bookstore.service.AccountServiceTest

Since in my earlier blog, we have already tested the DAO layer, in this blog we only need to focus on testing service layer. We need to mock the DAO layer so that we can control the behavior in Service layer and cover various scenarios. Mockito is a good framework which is used to mock a method and return known data and assert that in the JUnit.

As a first step we define the AccountServiceTestContextConfiguration class with AccountServiceTest class. If you notice there are 2 beans defined in that class and we marked the as a @Configuration which shows that it is a Spring Context class. In the JUnit test we @Autowired AccountService class. And AccountServiceImpl @Autowired the AccountRepository class. When creating the Bean in the configuration file we also stubbed the AccountRepository class using Mockito,

@RunWith(SpringJUnit4ClassRunner.class)
@ContextConfiguration
public class AccountServiceTest {

@Configuration
static class AccountServiceTestContextConfiguration {
@Bean
public AccountService accountService() {
return new AccountServiceImpl();
}
@Bean
public AccountRepository accountRepository() {
return Mockito.mock(AccountRepository.class);
}
}

//We Autowired the AccountService bean so that it is injected from the configuration
@Autowired
private AccountService accountService;
@Autowired
private AccountRepository accountRepository;

During the setup of the JUnit we use Mockito mock findByUsername method to return a predefined account object as below

@Before
public void setup() {
Account account = new AccountBuilder() {
{
address("Herve", "4650", "Rue de la gare", "1", null, "Belgium");
credentials("john", "secret");
name("John", "Doe");
}
}.build(true);
Mockito.when(accountRepository.findByUsername("john")).thenReturn(account);
}

Now we write the tests as below and test both the positive and negative scenarios,

@Test(expected = AuthenticationException.class)
public void testLoginFailure() throws AuthenticationException {
accountService.login("john", "fail");
}
@Test()
public void testLoginSuccess() throws AuthenticationException {
Account account = accountService.login("john", "secret");
assertEquals("John", account.getFirstName());
assertEquals("Doe", account.getLastName());
}
}

Finally we verify if the findByUsername method is called only once successfully as below in the teardown,

@After
public void verify() {
Mockito.verify(accountRepository, VerificationModeFactory.times(1)).findByUsername(Mockito.anyString());
// This is allowed here: using container injected mocks
Mockito.reset(accountRepository);
}

AccountService class looks as below,


@Service
@Transactional(readOnly = true)
public class AccountServiceImpl implements AccountService {

@Autowired
private AccountRepository accountRepository;

@Override
public Account login(String username, String password) throws AuthenticationException {
Account account = this.accountRepository.findByUsername(username, password);
} else {
throw new AuthenticationException("Wrong username/password", "invalid.username");
}
return account;
}
}

I hope this blog helped you. In my next blog, I will demo how to build a controller JUnit test.

Reference:

Pro Spring MVC: With Web Flow by by Marten Deinum, Koen Serneels
JUnit testing of Spring MVC application: Testing DAO layer

[I have added a new Spring Boot Tutorial on this, please review give me feedback.]

In continuation of my blog JUnit testing of Spring MVC application – Introduction, in this blog, I will show how to design and implement DAO layer for the Bookstore Spring MVC web application using Test Driven development.

For people in hurry, get the latest code from Github and run the below command

mvn clean test -Dtest=com.example.bookstore.repository.JpaBookRepositoryTest

As a part of TDD,

  • Write a basic CRUD (create, read, update, delete) operations on a Book DAO class com.example.bookstore.repository.JpaBookRepository. Don’t have the database wiring yet in this DAO class. Once we build the JUnit tests, we use JPA as a persistence layer. We also use H2 as a inmemory database for testing purpose.
  • Create Book POJO class

Create the JUnit test as below,

public class JpaBookRepositoryTest {
@Test
public void testFindById() {
Book book = bookRepository.findById(this.book.getId());
assertEquals(this.book.getAuthor(), book.getAuthor());
assertEquals(this.book.getDescription(), book.getDescription());
assertEquals(this.book.getIsbn(), book.getIsbn());
}

@Test
public void testFindByCategory() {
List<Book> books = bookRepository.findByCategory(category);
assertEquals(1, books.size());

for (Book book : books) {
assertEquals(this.book.getCategory().getId(), category.getId());
assertEquals(this.book.getAuthor(), book.getAuthor());
assertEquals(this.book.getDescription(), book.getDescription());
assertEquals(this.book.getIsbn(), book.getIsbn());
}
}

@Test
@Rollback(true)
public void testStoreBook() {
Book book = new BookBuilder() {
{
description("Something");
author("JohnDoe");
title("John Doe's life");
isbn("1234567890123");
category(category);
}
}.build();

bookRepository.storeBook(book);

Book book1 = bookRepository.findById(book.getId());

assertEquals(book1.getAuthor(), book.getAuthor());
assertEquals(book1.getDescription(), book.getDescription());
assertEquals(book1.getIsbn(), book.getIsbn());
}
}

If you notice since the JpaBookRepository is only a skeleton class without implementation, all the tests will fail.

As a next step, we need to create a Configuration and wire a datasource, and for the test purpose we will be using H2 database. And we also need to wire this back to JUnit test as below,

@Configuration
public class InfrastructureContextConfiguration {
@Autowired
private DataSource dataSource;
//some more configurations..
@Bean
public DataSource dataSource() {
EmbeddedDatabaseBuilder builder = new EmbeddedDatabaseBuilder();
builder.setType(EmbeddedDatabaseType.H2);
return builder.build();
}
}

//JUnit test wiring is as below

@RunWith(SpringJUnit4ClassRunner.class)
@ContextConfiguration(classes = { InfrastructureContextConfiguration.class, TestDataContextConfiguration.class })
@Transactional
public class JpaBookRepositoryTest {
//the test methods
}

Next step is to setup and teardown sample data in the JUnit test case as below,

public class JpaBookRepositoryTest {
@PersistenceContext
private EntityManager entityManager;

private Book book;
private Category category;

@Before
public void setupData() {
EntityBuilderManager.setEntityManager(entityManager);

category = new CategoryBuilder() {
{
name("Evolution");
}
}.build();

book = new BookBuilder() {
{
description("Richard Dawkins' brilliant reformulation of the theory of natural selection");
author("Richard Dawkins");
title("The Selfish Gene: 30th Anniversary Edition");
isbn("9780199291151");
category(category);
}
}.build();
}

@After
public void tearDown() {
EntityBuilderManager.clearEntityManager();
}
}

Once we do the wiring, we need to implement the com.example.bookstore.repository.JpaBookRepository and use JPA to do the CRUD on the database and run the tests. The tests will succeed.

Finally if you run Cobertura for this example from STS, we will get over 90% of line coverage for com.example.bookstore.repository.JpaBookRepository. In case you want to try few exercises you can implement repository for Account and User.

I hope this blog helped you. In my next blog I will talk about Mochito and Implementing the Service layer.

Reference:

Pro Spring MVC: With Web Flow by by Marten Deinum, Koen Serneels

Configuring Spring MVC for AJAX to enable SEO

AJAX based web applications always have challenges with Search engines. The fundamental aspect of AJAX is the content bound to AJAX components are not statically bound when the page loads, but are partially rendered as and when a page events occur and loaded in Javascript DOM tree. Search engines like Google and Bing only indexes static contents.

One of our applications has been built using modern web technologies and was completely Ajax based. We extensively used Backbone.js and other AJAX based technologies. And our application was not optimized for Search engines. As our application was built around Spring MVC so as a first step, I wanted to explore if Spring supports SEO. I found a blog from MKYong Spring 3 MVC ContentNegotiatingViewResolver example. We tried this example and it was slightly complicated to setup our application using this technique.

On further research we found an interesting article in Google Webmasters link. As per this link for every request if we pass a “_escaped_fragment_” the Search Engine are capable of indexing these links. In order enable this in a Spring MVC application; we need to use a framework like Phantom.js. Phantom.js has a capability where in it will take all the data in a DOM tree and output HTML content.

As a 1st step create a Phantom.js script as below,

var page = require('webpage').create();
var system = require('system');

// Open the page
page.open(system.args[1], function (status) {
console.log(page.content);
phantom.exit();
});

We need to execute this code from Java and pass the server returned content to this code as below,

public static String contentBuilderHelper(String redirectUrl){
pbCommand.add("phantom-server.js");
pbCommand.add(redirectUrl);
ProcessBuilder builder = new ProcessBuilder(pbCommand);

final Process process = builder.start();
InputStream is = process.getInputStream();
InputStreamReader isr = new InputStreamReader(is);
BufferedReader br = new BufferedReader(isr);
String line;
while ((line = br.readLine()) != null) {
output = output + line;
}
return output;
}

Configure Spring MVC component is we need to create a custom filter as below,

public class CrawlerFilter implements Filter{
...
public void doFilter(ServletRequest request, ServletResponse response,
FilterChain chain) throws IOException, ServletException {
HttpServletRequest httpRequest = (HttpServletRequest) request;
if(httpRequest.getParameter("_escaped_fragment_")!=null){
String redirectUrl = httpRequest.getRequestURL().toString()+"#!"+httpRequest.getParameter("_escaped_fragment_");
redirectUrl = URLDecoder.decode(redirectUrl,"UTF-8");
System.out.println(redirectUrl);
try {
//Get content from the web
String content = contentBuilderHelper(redirectUrl);
response.setContentType("text/html");
PrintWriter out = response.getWriter();
out.write(content);
out.close();
} catch (InterruptedException e) {
e.printStackTrace();
}
}
chain.doFilter(request, response);
}
...
}

Configuring filter in web.xml

<filter>
<filter-name>GoSmarter Crawler Filter</filter-name>
<filter-class>com.example.filter.CrawlerFilter</filter-class>
</filter>

<filter-mapping>
<filter-name>Crawler Filter</filter-name>
<url-pattern>/*</url-pattern>
</filter-mapping>

Finally, we also need to configure Phantom.js framework in Tomcat server.

I hope this blog helped you.

JUnit testing REST Services and Spring MVC

For people in hurry get the latest code in Github and run “mvn test”

Introduction

There is a good comparison of Webservices and REST here. REST Services a point-to-point communication over HTTP using XML. There are couple of good discussion around this, in this Stackoverflow article and Toolbox article.

Spring MVC is a good framework to develop REST Services. In this blog I will show you how JUnit test REST Services. I started trying out few of materials around spring-test-mvc and testing Spring MVC REST Services. The GET was working, but the POST was not working. You can see that in the JUnit test in the sample. Next I started trying MockHttpServletRequest/ MockHttpServletResponse there is a good material in Stacktrace on JUnit testing Spring MVC and REST Services. I followed the steps, but it still did not work. It was throwing an exception related to PropertyEditor. There was a good article on how to get this error fixed. Once I put this fix it started working.

Details: JUnit for Spring MVC and REST Services

In this example, we developed a REST Service and Spring MVC, which has 5 operations, getAll, findbyId, create, update, delete and we write JUnit test to call each operations and assert for the expected value.

Based on TDD, we write the test first and for all the 5 methods and assert for expected values as below,

@Test
public void testGetLoanRequest() throws Exception {
LoanRequest loanRequest1 = new LoanRequest();
loanRequest1.setId(2);
ibatisTemplate.insert("GoSmarter.loanRequestInsert", loanRequest1);
requestMock.setMethod("GET");
requestMock.setRequestURI("/loanrequests/2");
handlerAdapter.handle(requestMock, responseMock, loanRequestController);
logger.debug(responseMock.getContentAsString());
LoanRequest loanRequest = mapper.readValue(responseMock.getContentAsString(), LoanRequest.class);
assertNotNull(loanRequest);
assertEquals(loanRequest.getId(), Integer.valueOf(2));
}

@Test
public void testListLoanRequest() throws Exception {
LoanRequest loanRequest1 = new LoanRequest();
ibatisTemplate.insert("GoSmarter.loanRequestInsert", loanRequest1);
loanRequest1 = new LoanRequest();
loanRequest1.setId(2);
ibatisTemplate.insert("GoSmarter.loanRequestInsert", loanRequest1);
requestMock.setMethod("GET");
requestMock.setRequestURI("/loanrequests");
handlerAdapter.handle(requestMock, responseMock, loanRequestController);
List loanRequests = mapper.readValue(responseMock.getContentAsString(), List.class);
assertNotNull(loanRequests);
assertEquals(loanRequests.size(), 2);
}

@Test
public void testCreateLoanRequest() throws Exception {
requestMock.setMethod("POST");
String jsonPcUser = mapper.writeValueAsString(loanRequest);
logger.debug(jsonPcUser);
requestMock.setRequestURI("/loanrequests/create/" + jsonPcUser );
handlerAdapter.handle(requestMock, responseMock, loanRequestController);
logger.debug(responseMock.getContentAsString());
assertEquals(responseMock.getContentAsString(), "true");
}

@Test
public void testListLoanUpdate() throws Exception {
requestMock.setMethod("POST");
LoanRequest loanRequest1 = new LoanRequest();
ibatisTemplate.insert("GoSmarter.loanRequestInsert", loanRequest1);
loanRequest1.setCustomerName("krishna prasad");
String jsonPcUser = mapper.writeValueAsString(loanRequest1);
logger.debug(jsonPcUser);
requestMock.setRequestURI("/loanrequests/update/" + jsonPcUser );
handlerAdapter.handle(requestMock, responseMock, loanRequestController);
logger.debug(responseMock.getContentAsString());
assertEquals(responseMock.getContentAsString(), "true");
LoanRequest loanRequest2 = (LoanRequest) ibatisTemplate.queryForObject(
"GoSmarter.loanRequestDetails", 1);
assertEquals(loanRequest2.getCustomerName(), "krishna prasad");
}

@Test
public void testListLoanDelete() throws Exception {
LoanRequest loanRequest1 = new LoanRequest();
ibatisTemplate.insert("GoSmarter.loanRequestInsert", loanRequest1);
requestMock.setMethod("POST");
requestMock.setRequestURI("/loanrequests/delete/1" );
handlerAdapter.handle(requestMock, responseMock, loanRequestController);
List loanRequests = (List) ibatisTemplate
.queryForList("GoSmarter.loanRequestList");
assertEquals(loanRequests.size(), 0);
}

If you see we need to setup the AnnotationMethodHandlerAdapter and setup MappingJacksonHttpMessageConverter. as below,


@Before
public void setUp() {
requestMock = new MockHttpServletRequest();
requestMock.setContentType(MediaType.APPLICATION_JSON_VALUE);
requestMock.setAttribute(HandlerMapping.INTROSPECT_TYPE_LEVEL_MAPPING, Boolean.FALSE);

responseMock = new MockHttpServletResponse();

handlerAdapter = new AnnotationMethodHandlerAdapter();
HttpMessageConverter[] messageConverters = {new MappingJacksonHttpMessageConverter()};
handlerAdapter.setMessageConverters(messageConverters);

mapper = new ObjectMapper();
loanRequest = new LoanRequest();
}

Once we do the setup, we need to add a InitBinder method in the controller as below,

public class LoanRequestController {
@InitBinder
public void initBinder(WebDataBinder b) {
b.registerCustomEditor(LoanRequest.class, new LoanRequestEditor());
}
}

public class LoanRequestEditor extends PropertyEditorSupport {
ObjectMapper mapper = new ObjectMapper();

@Override
public void setAsText(String text) throws IllegalArgumentException {
LoanRequest obj = mapper.readValue(text, LoanRequest.class);
setValue(obj);
}

@Override
public String getAsText() {
return getValue().toString();
}
}

Conclusion

In the above example, we used MockHttpServletRequest and MockHttpServletResponse to do Junit test of REST Services and Spring MVC.

I hope it helped.

Responsive Web Design using Twitter Bootstrap, Spring MVC

Introduction

Responsive Web Design is a new way of building web application. Once you build a application using Responsive Web Design, you will be easily able to make this web application work on any device including Mobile and Handheld devices. Twitter the company open sourced their Twitter Bootstrap framework which supports Responsive Web Design(RWD). Kickstrap is another variant of Twitter Bootstrap. In this blog, I will demonstrate how we will build a Spring MVC based application that uses jquery-tmpl to build a JSON based RWD.

The use case we cover is a simple Airline reservation system, where in for a given origin, destination, the start and end date, we return all the flights. When we select a flight, we show all the deals in the target location.

For people in hurry get the code and the steps from @ Github.

Responsive Web Design

There are 3 key technical features that are heart of Responsive Web design:

Flexible grid-based layout: When you are viewing the page on a mobile devices, when you change the device to landscape or portrait, the page layout automatically adjusts and flows to display within the layout, this is Flexible grid-based layout. In Twitter Bootstrap, it can be achieved using CSS tags as below,

<div class="row-fluid"><!-- put some HTML stuff --></div>

Flexible images: dynamic resizing of images

Media queries: This is CSS3 feature, where in the CSS is returned to the Browser based on querying the Media device. Typical HTML tag you use for this as below,

<!-- for iPad, this is how the media query looks like -->
<link rel="stylesheet" media="all and (orientation:portrait)" href="portrait.css">
<link rel="stylesheet" media="all and (orientation:landscape)" href="landscape.css">

Spring MVC and Twitter Bootstrap

The overall data flow is as below,

Responsive Web Design using Twitter Bootstrap, Spring MVC

Responsive Web Design using Twitter Bootstrap, Spring MVC

In this example we build a Single Page Website using Twitter Bootstrap and JQuery-tmpl. On the frontend side, the data is submitted as below,


$('#searchResults').click(function(){
var origin =  $("#origin option:selected").val();
var destination = $("#destination option:selected").val();
var startDate= $("#startDate").val();
var endDate = $("#endDate").val();

$.get("resources/datatemplates/flightList.html", function (template){
$.get("/air/searchResultsJson?leavingFrom=" + origin + "&goingTo=" + destination + "&startDate=" + startDate + "&endDate=" + endDate, function (data){
$("#dataRegion").html("");
$.tmpl(template, data).appendTo("#dataRegion");
});
});
return false;
}

This executes a JQuery and gets the list of flights in the form as JSon objects.

The JQuery-tmpl plugin is used to bind the flightList.html to achieve Single Page Webpage design. The flightList.html looks as below,

<tr>
<td>${startTime}</td>
<td>${startAirport}</td>
<td>${endTime}</td>
<td><a href="#" onclick="return getDetails('${endAirport}')">${endAirport}</a></td>
</tr>

On the Spring MVC side, we need to add the Maven dependency and call the method, refer this link for more details.

The controller code looks as below,

@RequestMapping(value = "searchResultsJson", method = RequestMethod.GET)
public @ResponseBody
List searchResultsJson(@RequestParam String leavingFrom,
@RequestParam String goingTo, @RequestParam String startDate,
@RequestParam String endDate) {
Form form = new Form();

form.setOrigin(leavingFrom);
form.setDestination(goingTo);
form.setStartDate(startDate);
form.setReturnDate(endDate);

return locationService.selectFlights(form);
}

In the above example @ResponseBody help in returning the JSon response to the client.

Conclusion

In this blog I demonstrated, how we can build a web application, that can be adapted to work on any device. It also show how to return JSon response from a Spring MVC based web application.

I hope it helps you.